生成钥匙对
GnuPG(GNU Privacy Guard)译作Gnu 隐私卫士。GnuPG用于加密、数字签名及产生非对称匙对。
- 安装:
sudo yum install gnupg - 查看帮助:
gpg --help
生成密钥
gpg --gen-key
GPG 默认使用 RSA 加密和2048bit长度。
You selected this USER-ID:
    "NeilYuen <[email protected]>"

/.gnupg/trustdb.gpg: trustdb created
gpg: key F4A6C5E7 marked as ultimately trusted
public and secret key created and signed.

gpg: checking the trustdb
gpg: 3 marginal(s) needed, 1 complete(s) needed, PGP trust model
gpg: depth: 0  valid:   1  signed:   0  trust: 0-, 0q, 0n, 0m, 0f, 1u
pub   4096R/F4A6C5E7 2016-04-09
      Key fingerprint = 4495 BC7D 281F 4E56 A7AE  01F0 6638 DBA8 F4A6 C5E7
uid                  NeilYuen <[email protected]>
sub   4096R/C10B6E26 2016-04-09
生成公钥“回收证书”
gpg --gen-revoke [用户ID]
$ gpg --gen-revoke NeilYuen
sec  4096R/F4A6C5E7 2016-04-09 NeilYuen <[email protected]>

Create a revocation certificate for this key? (y/N) Y
Please select the reason for the revocation:
  0 = No reason specified
  1 = Key has been compromised
  2 = Key is superseded
  3 = Key is no longer used
  Q = Cancel
(Probably you want to select 1 here)
Your decision? 3
Enter an optional description; end it with an empty line:
>
Reason for revocation: Key is no longer used
(No description given)
Is this okay? (y/N) y

You need a passphrase to unlock the secret key for
user: "NeilYuen <[email protected]>"
4096-bit RSA key, ID F4A6C5E7, created 2016-04-09

ASCII armored output forced.
Revocation certificate created.

Please move it to a medium which you can hide away; if Mallory gets
access to this certificate he can use it to make your key unusable.
It is smart to print this certificate and store it away, just in case
your media become unreadable.  But have some caution:  The print system of
your machine might store the data and make it available to others!
-----BEGIN PGP PUBLIC KEY BLOCK-----
Version: GnuPG v1
Comment: A revocation certificate should follow

...(省略密钥)

-----END PGP PUBLIC KEY BLOCK-----
列出密钥
$ gpg --list-keys

/home/weaming/.gnupg/pubring.gpg
--------------------------------
pub   4096R/F4A6C5E7 2016-04-09
uid                  NeilYuen <[email protected]>
sub   4096R/C10B6E26 2016-04-09
第一行显示公钥文件名(pubring.gpg),第二行显示公钥特征(2048位,Hash字符串和生成时间),第三行显示"用户ID”,第四行显示私钥特征。
输出密钥
gpg --armor --output public-key.txt --export [用户ID]
公钥文件(.gnupg/pubring.gpg)以二进制形式储存,armor参数可以将其转换为ASCII码显示。“用户ID"指定哪个用户的公钥,output参数指定输出文件名(public-key.txt)。
类似地,export-secret-keys参数可以转换私钥。
gpg --armor --output private-key.txt --export-secret-keys
~/.gnupg/目录
.gnupg/
├── gpg.conf
├── pubring.gpg
├── pubring.gpg~
├── random_seed
├── secring.gpg
└── trustdb.gpg
https://www.gnupg.org/documentation/manuals/gnupg/GPG-Configuration.html
~/.gnupg/pubring.gpg
  The public keyring. You should backup this file.
~/.gnupg/pubring.kbx
  The public keyring using a different format. This file is sharred with gpgsm. You should backup this file.
~/.gnupg/secring.gpg
  A secret keyring as used by GnuPG versions before 2.1. It is not used by GnuPG 2.1 and later.
~/.gnupg/.gpg-v21-migrated
  File indicating that a migration to GnuPG 2.1 has been done.
~/.gnupg/trustdb.gpg
  The trust database. There is no need to backup this file; it is better to backup the ownertrust values (see option –export-ownertrust).
~/.gnupg/random_seed
  A file used to preserve the state of the internal random pool.
- gpg.conf:gpg配置文件
- pubring.gpg:公钥环。需备份。
- pubring.gpg~:未知
- random_seed:随机种子
- secring.gpg:密钥环。用户 GnuPG 2.1 (不含)之前。需备份。
- trustdb.gpg:信任公钥的数据库。无需备份。
GnuPG 2.1 以后移除了secring.gpg文件。(https://www.gnupg.org/faq/whats-new-in-2.1.html#nosecring)
上传公钥
gpg --send-keys [用户ID] --keyserver hkp://subkeys.pgp.net
# 生成公钥指纹
gpg --fingerprint [用户ID]
导入密钥
将他人的公钥或者你的其他密钥输入系统
gpg --import [密钥文件]
gpg --keyserver hkp://subkeys.pgp.net --search-keys [用户ID]
加密和解密
加密
gpg --recipient [用户ID] --output demo.en.txt --encrypt demo.txt
encrypt参数用于加密。recipient参数指定接收者的公钥,output参数指定加密后的文件名,encrypt参数指定源文件。
解密
gpg --decrypt demo.en.txt --output demo.de.txt

gpg demo.en.txt
签名
对文件签名
# demo.txt.gpg文件,二进制存储
gpg --sign demo.txt
# demo.txt.asc文件,ascii码存储
gpg --clearsign demo.txt
# 生成单独的签名文件demo.txt.sig(该文件是二进制),与文件内容分开存放。
# 这个用得比较多。
gpg --detach-sign demo.txt
# ASCII码形式,单独签名文件
gpg --armor --detach-sign demo.txt
例如:
$ gpg --clearsign hello.c
You need a passphrase to unlock the secret key for user: "NeilYuen <[email protected]>"
4096-bit RSA key, ID F4A6C5E7, created 2016-04-09

$ cat hello.c.asc
-----BEGIN PGP SIGNED MESSAGE-----
Hash: SHA1

(省略文本内容)
-----BEGIN PGP SIGNATURE-----
Version: GnuPG v1

(省略公钥)
-----END PGP SIGNATURE-----
签名 + 加密
gpg --local-user [发信者ID] --recipient [接收者ID] --armor --sign --encrypt demo.txt
local-user参数指定用发信者的私钥签名,recipient参数指定用接收者的公钥加密,armor参数表示采用ASCII码形式显示,sign参数表示需要签名,encrypt参数表示指定源文件。
验证签名
gpg --verify demo.txt.asc demo.txt
Github 用GPG签名
Github 添加GPG公钥
https://github.com/settings/keys
git 设置公钥
git config --global user.signingkey public-GPG-key
例如:
$ gpg --list-keys
/Users/hubot/.gnupg/pubring.gpg
------------------------------------
pub   4096R/A8F99211 2016-04-05
uid                  Hubot
sub   4096R/Z832QR89 2016-04-05

$ git config --global user.signingkey A8F99211
签名 commit
添加-S参数即可。
git commit -S -m "your commit message"
$ git commit -S -m 'update GPG'

You need a passphrase to unlock the secret key for
user: "NeilYuen <[email protected]>"
4096-bit RSA key, ID F4A6C5E7, created 2016-04-09

[master 874c525] update GPG
 1 file changed, 156 insertions(+), 21 deletions(-)
效果如下: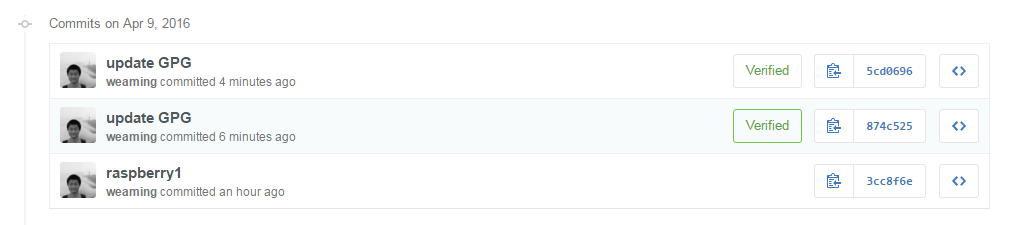
签名 tags
添加-s参数即可。
$ git tag -s mytag
公钥服务器
一个密钥服务器是一个发布公共密钥证书并使其可搜索的服务。您可以上传您的证书到钥匙服务器,以便其他用户能够找到它。因为密钥服务器的共享密钥的分布式网络的存在,你只需要一次上传您的钥匙到该网络。
例如:我的搜索结果
钥匙管理 @
随系统而来,有一个文件,起到某种数据库的作用。 所有有关钥匙和钥匙附带信息的数据都存在这个文件里(只有一样例外:主人的信任值。更多的信息见 钥匙签名)。用

 gpg --list-keys
可以显示所有现有的钥匙。 要想同时显示签名,用
  gpg --list-sigs
(更多的信息见 钥匙签名)。 要想见到钥匙的指纹,敲入:
 gpg --fingerprint
用户需要见到”指纹”来确认某人的确是其自称是的人(就象在电话中一样)。 这个命令将会产生一列相对较小的数字。
要列出私密钥匙,你可以敲

 gpg --list-secret-keys
注意:列出私密钥匙的指纹和签名根本就没用。
要删除一把公钥,你可以敲

 gpg --delete-key UID
要删除一把密钥,你可以敲
  gpg --delete-secret-key
还有一个与钥匙有关的重要命令:

 gpg --edit-key UID
用此命令你可以修改钥匙的失效日期,加进一个指纹,对钥匙签名等等。
一些加密方式 @
公开密钥加密
也称为非对称加密(asymmetric cryptography),一种密码学算法类型,在这种密码学方法中,需要一对密钥,一个是私人密钥,另一个则是公开密钥。这两个密钥是数学相关,用某用户密钥加密后所得的信息,只能用该用户的解密密钥才能解密。如果知道了其中一个,并不能计算出另外一个。因此如果公开了一对密钥中的一个,并不会危害到另外一个的秘密性质。称公开的密钥为公钥;不公开的密钥为私钥。
如果加密密钥是公开的,这用于客户给私钥所有者上传加密的数据,这被称作为公开密钥加密(狭义)。例如,网络银行的客户发给银行网站的账户操作的加密数据。
如果解密密钥是公开的,用私钥加密的信息,可以用公钥对其解密,用于客户验证持有私钥一方发布的数据或文件是完整准确的,接收者由此可知这条信息确实来自于拥有私钥的某人,这被称作数字签名,公钥的形式就是数字证书。例如,从网上下载的安装程序,一般都带有程序制作者的数字签名,可以证明该程序的确是该作者(公司)发布的而不是第三方伪造的且未被篡改过(身份认证/验证)。
RSA
RSA是世界上首屈一指的非对称密码算法,对极大整数做因数分解的难度决定了RSA算法的可靠性。在公开密钥加密和电子商业中RSA被广泛使用。RSA是1977年由罗纳德·李维斯特(Ron Rivest)、阿迪·萨莫尔(Adi Shamir)和伦纳德·阿德曼(Leonard Adleman)一起提出的。当时他们三人都在麻省理工学院工作。RSA就是他们三人姓氏开头字母拼在一起组成的。
针对RSA最流行的攻击一般是基于大数因数分解。1999年,RSA-155 (512 bits)被成功分解,花了五个月时间(约8000 MIPS年)和224 CPU hours在一台有3.2G中央内存的Cray C916计算机上完成。2002年,RSA-158也被成功因数分解。2009年12月12日,编号为RSA-768(768 bits, 232 digits)数也被成功分解。此事威胁了现通行的1024-bit密钥的安全性,用户应尽快升级到2048-bit或以上。
DSA
美国的国家标准技术研究所(NIST)建立了数字签名算法(DSA)作为政府的数字签名标准。最初,它支持512和1024位之间的密钥长度。最近,NIST宣布512位密钥的过时的:现在,DSA有1024,2048和3072位长度。DSA属于Elgamal的算法家族,广受好评。
Elgamal
In cryptography, the ElGamal encryption system is an asymmetric key encryption algorithm for public-key cryptography which is based on the Diffie–Hellman key exchange. It was described by Taher Elgamal(是SSL的最初设计者,被称为SSL之父) in 1985.
AES
高级加密标准(英语:Advanced Encryption Standard),在密码学中又称Rijndael加密法,是美国联邦政府采用的一种区块加密标准。这个标准用来替代原先的DES,已经被多方分析且广为全世界所使用。经过五年的甄选流程,AES由NIST于2001年11月26日发布于FIPS PUB 197,并在2002年5月26日成为有效的标准。2006年,高级加密标准已然成为对称密钥加密中最流行的算法之一。
该算法为比利时密码学家Joan Daemen和Vincent Rijmen所设计。Rijndael是由Daemen和Rijmen早期所设计的Square改良而来;而Square则是由SHARK发展而来。
不同于它的前任标准DES,Rijndael使用的是代换-置换网络,而非Feistel架构。AES在软件及硬件上都能快速地加解密,相对来说较易于实现,且只需要很少的内存。
严格地说,AES和Rijndael加密法并不完全一样(虽然在实际应用中两者可以互换),因为Rijndael加密法可以支持更大范围的区块和密钥长度:AES的区块长度固定为128 比特,密钥长度则可以是128,192或256比特;而Rijndael使用的密钥和区块长度可以是32位的整数倍,以128位为下限,256比特为上限。加密过程中使用的密钥是由Rijndael密钥生成方案产生。截至2006年,针对AES唯一的成功攻击是旁道攻击。